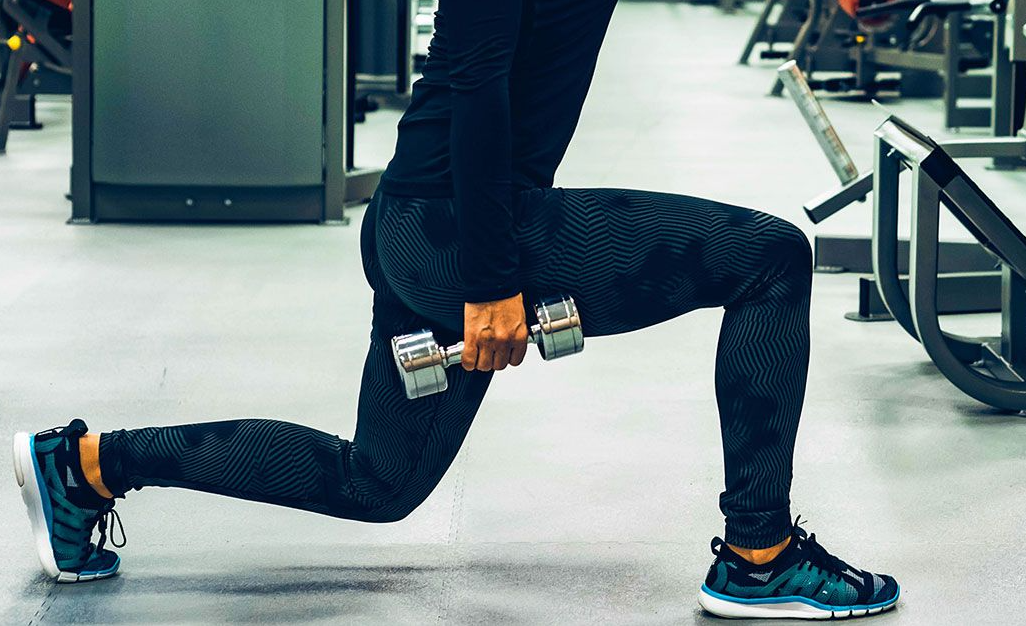
Reverse lunges strengthen the legs and glutes while challenging balance and coordination. Unlike forward lunges, which involve stepping ahead of the body, reverse lunges begin with a backward step. The front foot stays planted, making it easier for many people to control their position throughout the movement.
The exercise requires little equipment and works well in strength training, athletic conditioning, and general fitness programs. Beginners can start with bodyweight repetitions, while experienced lifters can add dumbbells, kettlebells, or a barbell.
Proper reverse lunge form matters more than the amount of weight used. Stride length, torso angle, and foot placement all affect how the exercise feels and which muscles carry the greatest load. Learning these details helps make each repetition more effective.
What Are Reverse Lunges?
The reverse lunge exercise involves stepping one foot backward, bending both knees, and lowering into a split stance. The front leg provides most of the force needed to return to standing, while the rear leg assists with balance and movement.
Reverse lunges belong to the same exercise family as forward, walking, and lateral lunges. Although these variations train many of the same muscles, their stepping patterns create different demands on balance, coordination, and force production.
During the lowering phase, the hips and knees bend as the body descends. The quadriceps and hip extensors control this movement before helping raise the body back to standing. Muscles around the pelvis and trunk help control unwanted sideways movement.
Repetitions can alternate between legs or be completed on one side before switching. Performing consecutive repetitions on the same leg allows a more consistent rhythm, while alternating sides adds a coordination challenge.
What Muscles Do Reverse Lunges Work?
Reverse lunges primarily target the quadriceps and glutes. The hamstrings, calves, and muscles surrounding the hips and trunk also contribute, particularly when maintaining balance or handling additional weight.
How much each muscle contributes depends on stride length, depth, torso angle, and resistance.
Quadriceps
The quadriceps run along the front of the thigh and straighten the knee. During a reverse lunge, they control knee bending on the way down and help extend the front leg as the body rises.
Greater knee flexion can increase quadriceps loading, although the effect also depends on torso position, external resistance, and individual mechanics.
Gluteus Maximus
The gluteus maximus is the largest muscle of the buttocks and a major contributor to hip extension.
It helps control the lowering phase as the front hip bends, then produces force to extend the hip during the return to standing.
A slight forward torso lean can shift more of the mechanical demand toward the hips. The spine should remain stable, without turning the lunge into an exaggerated hip hinge.
Hamstrings
The hamstrings assist with hip extension and help stabilize the knee and hip during the movement.
They contribute to reverse lunges but are not the primary muscles being trained. Unlike Romanian deadlifts, which load the hamstrings heavily during a hip hinge, lunges distribute the work more broadly across the quadriceps and glutes.
Gluteus Medius and Hip Stabilizers
The gluteus medius and other smaller hip muscles help keep the pelvis level and control the position of the front leg.
Their contribution becomes particularly important when the body is supported mainly by one leg. Poor coordination or insufficient strength in these muscles can contribute to pelvic dropping or uncontrolled inward knee movement.
Calves and Core Muscles
The calf muscles help stabilize the ankle and maintain pressure through the foot. Meanwhile, the abdominal muscles, obliques, and spinal erectors support the torso.
These muscles become especially important when using heavier weights, since the body must resist unwanted leaning and rotation.
How to Perform Reverse Lunges Step by Step
A proper reverse lunge starts from a stable standing position. Each repetition involves stepping backward, lowering under control, and returning to standing primarily through the front leg.
Step 1: Establish Your Starting Position
Stand with your feet approximately hip-width apart, with your toes pointing forward or slightly outward.
Keep your shoulders relaxed and your spine in a natural position. Your arms can rest at your sides or extend slightly forward to help with balance.
Brace your abdominal muscles gently, as though preparing for a light push against your stomach.
Step 2: Step Backward
Shift your weight onto one leg and step backward with the opposite foot.
Leave some side-to-side distance between your feet. Imagine stepping along two parallel tracks rather than placing one foot directly behind the other.
Land on the ball of the rear foot, keeping its heel raised. Choose a stride long enough to let both knees bend comfortably without stretching excessively.
Step 3: Lower Your Body
Bend both knees and lower your hips toward the floor.
Keep the front foot planted, with pressure distributed between the heel and forefoot. Your front knee should generally move in the same direction as your toes.
It is acceptable for the knee to travel beyond the toes when the movement remains comfortable and controlled.
Lower until both knees are comfortably bent. Roughly 90 degrees of knee flexion can serve as a reference, but it is not a strict requirement.
Allow the rear knee to approach the floor without dropping onto it. Keep your hips relatively level throughout the descent.
Step 4: Return to Standing
Press through the front foot and extend the front hip and knee to raise your body.
The rear leg can assist naturally, but avoid relying on a forceful push from the back foot to propel yourself upward.
Bring the rear foot forward and finish in a balanced standing position.
Exhale as you rise during ordinary repetitions with moderate resistance. For heavier lifting, breathing and abdominal bracing may need to be coordinated differently.
Step 5: Repeat on Both Sides
Repeat the movement with the opposite leg.
Beginners may find it easier to complete several repetitions on one side before switching. Once the stepping pattern feels natural, alternating legs provides another useful option.
For general fitness, start with 2–3 sets of 8–12 repetitions per leg. Adjust the volume according to your strength, experience, and the weight being used.
Reverse Lunge Technique Tips
A few practical adjustments can improve consistency:
- Keep the front foot grounded. Maintain contact through the heel and forefoot without rolling onto the inner or outer edge.
- Find a comfortable stride. Avoid steps so short that the position feels cramped or so long that balance becomes difficult.
- Control the lowering phase. Taking roughly two seconds to descend can help beginners avoid rushing.
- Maintain knee alignment. Guide the front knee in the general direction of the toes without forcing it into a rigid position.
- Keep your torso stable. A slight forward lean is acceptable, but avoid excessive rounding or twisting.
- Use a manageable depth. Stop before losing balance or control of the hips and knees.
If balance is limiting your technique, lightly hold a wall, railing, or another stable support.
Benefits of Reverse Lunges
Reverse lunges combine lower-body strength training with the balance and coordination demands of stepping backward. Their benefits extend beyond simply working the thighs.
Build Lower-Body Strength
The quadriceps and glutes generate force through repeated hip and knee extension.
Because each leg takes a turn as the primary working limb, reverse lunges complement bilateral exercises such as squats and leg presses.
Adding external resistance provides a straightforward way to increase the challenge as strength improves.
Develop Single-Leg Stability
Each repetition requires the supporting leg to control the body’s position while the other leg steps backward.
The muscles surrounding the hip, knee, and ankle work together to prevent excessive movement. With practice, this can improve steadiness during similar single-leg exercises.
That control is relevant to everyday tasks such as stepping onto a curb, climbing stairs, and negotiating uneven ground.
Address Side-to-Side Strength Differences
During bilateral exercises, a stronger leg may contribute more force without the difference being obvious.
Reverse lunges make it easier to observe whether one side struggles with balance, depth, or resistance.
Unilateral training can help address these differences, although correcting a significant imbalance may require adjustments to exercise selection, volume, or loading.
Offer a More Controlled Stepping Pattern
Many beginners find backward lunges easier to manage than forward lunges.
A forward lunge requires the stepping leg to absorb and slow the body’s forward movement. With a reverse lunge, the planted front foot provides a more consistent base.
This difference may make reverse lunges more comfortable for some people, but it does not guarantee lower knee stress. Joint loading still depends on technique, depth, speed, and resistance.
Improve Coordination and Body Awareness
Stepping backward requires awareness of foot placement without continuously watching the moving leg.
The hips, knees, ankles, and trunk must coordinate to lower and raise the body without unnecessary swaying.
Repeated practice makes the stepping pattern more familiar and can improve control in similar movements.
Fit Different Training Goals
Reverse lunges can be used for strength, muscle development, general conditioning, or athletic preparation.
Bodyweight repetitions are practical for learning technique, while weighted variations provide additional resistance for more experienced lifters.
They also require relatively little space, making them suitable for home workouts and gyms.
Common Reverse Lunge Mistakes to Avoid
Most reverse lunge mistakes involve foot placement, balance, or using more resistance than can be controlled.
Taking an Extremely Short Step
A very short backward step can leave insufficient room for the rear knee and create an uncomfortable position.
It may also force the front knee farther forward than the person can comfortably manage.
How to fix it: Lengthen the stride slightly until both knees can bend naturally. The ideal distance depends on your height, proportions, and mobility.
Stepping Directly Behind the Front Foot
Placing the rear foot directly behind the front foot creates a narrow, tightrope-like stance.
This reduces the base of support and makes balancing unnecessarily difficult.
How to fix it: Leave enough space between your feet to avoid a tightrope-like stance.
Letting the Front Knee Collapse Inward
The front knee may drift inward when fatigue increases or the load becomes too demanding.
Minor variations in knee movement are normal. The concern is repeated, uncontrolled inward movement that disrupts balance or causes discomfort.
How to fix it: Maintain steady pressure across the front foot and guide the knee toward the toes. Reduce the weight or depth if necessary.
Pushing Too Much With the Rear Leg
A forceful push from the rear foot can shift work away from the front leg.
Although the back leg naturally assists, it should not provide most of the upward drive.
How to fix it: Focus on extending the front hip and knee while bringing the rear leg forward smoothly.
Leaning or Twisting Excessively
Some forward torso inclination is normal, particularly when emphasizing the hip extensors.
However, uncontrolled leaning, spinal rounding, or twisting can interfere with balance and consistent loading.
How to fix it: Keep the rib cage and pelvis reasonably aligned. Allow a natural forward lean without collapsing through the lower back.
Rushing Through Repetitions
Moving too quickly can lead to inconsistent foot placement, shortened range of motion, or a loss of balance.
Faster repetitions are not inherently incorrect, but speed should not replace control.
How to fix it: Slow the descent and return to standing smoothly. Avoid bouncing off the rear knee or using momentum to complete the repetition.
Using More Weight Than You Can Control
Heavy dumbbells or barbells can make small technique problems more noticeable.
If the added weight causes repeated loss of balance, uneven depth, or uncontrolled knee movement, the load is probably too demanding.
How to fix it: Choose a resistance that allows consistent repetitions on both sides. Increase the weight gradually once the movement remains stable.
Reverse Lunge Variations for Different Fitness Levels
Reverse lunges can be adapted to different strength levels and training goals. The best variation depends on whether strength, balance, mobility, or coordination is the main priority.
Supported Reverse Lunges
Supported reverse lunges are particularly useful for beginners who struggle with balance. When teaching reverse lunges for beginners, a light handhold can make the stepping pattern easier to learn.
Stand beside a sturdy surface and hold it lightly with one hand. Step backward and lower into the lunge, using the support only as much as necessary.
As balance improves, gradually reduce how much assistance you need.
This approach allows you to focus on leg strength and foot placement instead of repeatedly correcting your balance.
Bodyweight Reverse Lunges
Bodyweight reverse lunges are a practical starting point because they require no additional equipment.
Perform each repetition at a pace that allows stable foot placement and a comfortable range of motion.
Once you can complete your target repetitions with good control, progress by adding resistance or gradually increasing depth if your mobility allows.
Dumbbell Reverse Lunges
Hold a dumbbell in each hand with your arms resting naturally at your sides.
Keep your shoulders relaxed and avoid swinging the weights as you step backward.
Dumbbells make it easy to increase resistance in relatively small increments. They are a convenient choice for progressive strength and muscle-building programs.
Goblet Reverse Lunges
For goblet reverse lunges, hold a dumbbell or kettlebell close to your chest with both hands.
The front-loaded position changes the balance demands and requires the trunk to resist collapsing forward.
Keep the weight close to your body and avoid extending your arms as fatigue increases.
This variation works well for lifters who prefer using one weight while practicing a stable torso position.
Barbell Reverse Lunges
Barbell reverse lunges allow experienced lifters to work with substantial resistance.
Position the bar securely across your upper back, as you would for a back squat. Step backward while keeping the bar stable and your torso braced.
Because the load sits higher on the body, balance and trunk control become particularly important.
Master the basic movement before progressing to heavier barbell repetitions. Use appropriate rack safety equipment when handling challenging loads.
Deficit Reverse Lunges
Deficit reverse lunges increase the available range of motion by elevating the front foot.
Start with both feet on a low, stable platform. Step one foot backward onto the floor while keeping the front foot elevated.
The additional height allows the front hip and knee to bend farther than in a standard reverse lunge, provided mobility permits.
Begin with a modest platform height. Avoid forcing extra depth if you cannot maintain stable positioning.
Reverse Lunges With a Knee Drive
This variation adds a single-leg balance challenge at the top of each repetition.
After pushing up from the lunge, bring the rear knee forward and upward instead of placing that foot immediately on the floor.
Pause briefly while balancing on the supporting leg, then step backward again.
The knee drive places greater emphasis on coordination and balance. Because maintaining stability becomes more demanding, it may limit how much external weight you can use.
Reverse Lunges vs Forward Lunges
Reverse and forward lunges work many of the same muscles, but stepping direction changes how the body handles momentum and distributes force.
Neither variation is automatically superior. The better choice depends on the training goal, individual comfort, and movement proficiency.
Movement Mechanics
In a reverse lunge, the front foot remains planted while the opposite leg steps backward. The body lowers into a split stance before returning to standing.
A forward lunge starts with a step ahead of the body. The leading leg must absorb body weight and decelerate forward momentum before pushing back.
This braking phase creates different demands on balance and force control.
Muscle Activation
Both variations involve substantial work from the quadriceps, gluteus maximus, and supporting hip muscles.
Stride length, torso angle, range of motion, and resistance influence the relative contribution of each muscle group.
It would be misleading to describe reverse lunges as exclusively glute-focused or forward lunges as primarily quadriceps exercises. Both require coordinated hip and knee extension.
Balance and Coordination
Reverse lunges often feel more predictable because the supporting front foot stays in contact with the ground.
Forward lunges add the challenge of landing and controlling the body’s movement after stepping ahead.
However, familiarity matters. Someone who regularly practices forward lunges may find them easier than the reverse variation.
Knee Loading
Forward lunges involve a distinct deceleration phase, which can affect the forces acting around the knee.
Some people find reverse lunges more comfortable, especially when using a moderate stride and controlled depth.
Still, stepping direction alone does not determine knee stress. External load, speed, joint angles, and individual mechanics all influence the forces involved.
Allowing the front knee to move beyond the toes is not inherently dangerous. A comfortable, controlled range of motion matters more than enforcing an arbitrary knee position.
Which Variation Should You Choose?
| Training consideration | Reverse lunges | Forward lunges |
| Step direction | Backward | Forward |
| Supporting foot | Front foot stays planted | Leading foot steps forward and lands |
| Momentum | Less forward braking | Greater forward deceleration demand |
| Balance | Often easier to control initially | Adds a landing challenge |
| Primary muscles | Quadriceps and glutes | Quadriceps and glutes |
| Resistance | Bodyweight, dumbbells, kettlebells, or barbell | Bodyweight, dumbbells, kettlebells, or barbell |
| Common uses | Single-leg strength, balance, general fitness | Strength, coordination, dynamic stepping |
Choose reverse lunges when controlled single-leg loading is the priority or when forward stepping feels uncomfortable.
Forward lunges are useful when training the ability to decelerate and control the body during a forward step.
Both variations can fit into the same program when training volume and recovery are managed appropriately.
FAQ
Are Reverse Lunges Better Than Squats?
Neither exercise is universally better.
Squats train both legs together and generally allow heavier external loads. Reverse lunges place greater emphasis on working each leg independently while maintaining balance.
Using both can provide a broader lower-body training stimulus than relying on either exercise alone.
Are Reverse Lunges Good for Beginners?
Yes. Beginners can perform reverse lunges with body weight and use a stable support if balance is difficult.
Start with a comfortable depth and consistent foot placement. Increase repetitions or resistance only after you can perform the movement without repeatedly losing balance.
Do Reverse Lunges Work the Glutes?
Yes. The gluteus maximus helps extend the hip as you rise, while the gluteus medius and other hip muscles contribute to pelvic stability.
A comfortable depth, controlled technique, and sufficient resistance make reverse lunges a useful addition to glute-focused workouts.
They do not isolate the glutes, since the quadriceps also perform substantial work.
How Many Reverse Lunges Should I Do?
For general fitness, 2–3 sets of 8–12 repetitions per leg are a reasonable starting point.
The appropriate number depends on your experience, the resistance used, and how the exercise fits into the rest of your training.
Choose a difficulty that makes the final repetitions challenging without noticeably compromising technique.
Should Your Knee Touch the Floor During Reverse Lunges?
The rear knee does not need to touch the floor.
Lowering it close to the ground provides a useful depth reference, but contact is optional. Avoid dropping onto the knee or bouncing off the floor to start the next repetition.
Use a depth that allows stable, comfortable movement.
Can Reverse Lunges Replace Forward Lunges?
Reverse lunges can replace forward lunges when the main goal is general lower-body strength or unilateral training.
However, forward lunges offer a different stepping and deceleration challenge. Athletes who need those qualities may benefit from including both variations.
Why Do I Lose Balance During Reverse Lunges?
A narrow stance, inconsistent stride length, or unfamiliarity with backward stepping can make reverse lunges difficult to balance.
Try widening your stance slightly and slowing the lowering phase.
If balance remains the main limitation, practice with light hand support before increasing resistance.